Maybelline Instant Age Rewind The Lifter Foundation
Today I am going to review the new Maybelline Instant Age Rewind The Lifter Foundation. I have the accompanying Perfector Powder as well, but I am only going to focus on the foundation for this review. The idea behind The Lifter is that is is a Dual action formula with a “smoothing primer plus a lifting foundation”. I have a lot to say about this foundation. I’ve seen a few reviews of the Maybelline Instant Age Rewind The Lifter Foundation, and it seems that people are having widely varied and unique experiences with this product. The Lifter seems to either work wonders, or not at all, and the results that people are getting are so different that it is confounding. Let me break down my experience with Maybelline Instant Age Rewind The Lifter Foundation.

Maybelline Instant Age Rewind The Lifter Foundation
Maybelline claims that this “Lifting foundation with peptides firms skin and covers instantly, while primer smooths lines and rough texture”. I don’t think I can say that I noticed any special firming action happening when I wore The Lifter, but perhaps the lifting and firming only happens after weeks of daily use. Let’s, for now, forget about the lifting and firming part, and focus on how The Lifter performs as a foundation.

Maybelline Instant Age Rewind The Lifter Foundation
Let’s start with packaging. Unlike the original Maybelline Instant Age Rewind Foundation, The Lifter comes with a pump dispenser instead of that awful sponge tip that I hated. It’s an airless pump, so instead of having a tube that runs down the center, the whole product shifts up as you use it, keeping that nifty spiral design in tact. Also unlike the original, The Lifter comes with a full standard 1 fl oz of product. The plastic packaging is functional, but not very attractive. The suspended spiral design of the product is really cool, and very enticing. It certainly caught my attention.

Maybelline Instant Age Rewind The Lifter Foundation
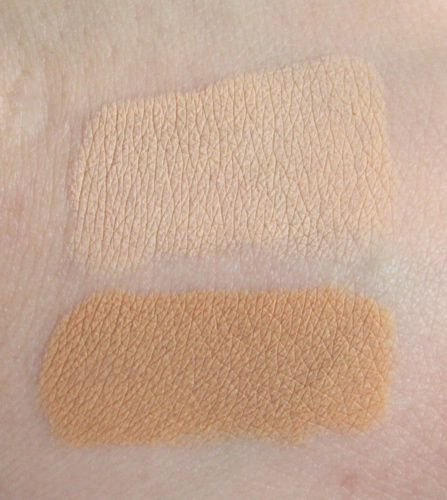
One pump of The Lifter delivers quite a bit of product. It’s tough to make out, but if you look closely, you can see the primer swirled into the foundation when you dispense it. As that spiral indicates, the foundation and primer are not fully incorporated until you blend them out on your face. I also thought that my shade (Nude Beige) looked much darker and more orange when it was pumped out of the tube than it did in the bottle. I was a little nervous when I first saw it, but when I blended it out, the color returned to the shade I was expecting it to be and looked fine on the skin. I don’t know if that issue is specific to this one shade or what, but I had a moment of panic, wondering if I’d end up looking like an Oompa Loompa.

Maybelline Instant Age Rewind The Lifter Foundation
Maybelline Instant Age Rewind The Lifter Foundation looks really thick when first dispensed. You can see how the creamy formula leaves peaks. What’s really strange, is that The Lifter feels thick and creamy while applying, but then it leaves such a lightweight feel on the skin. It’s because of this creamy formula, however, that I strongly recommend using your fingers to apply. A sponge or a brush end up soaking up way too much of the product, and they don’t give you very good coverage. Maybelline recommends you use your fingers as well. I believe that the glycerin based primer needs that circular motion to really work into the skin. I found that my best method was to apply most of the way with my fingers, and then use a brush to just smooth out the finish.
The Lifter applies with a silky, cool feel that my dry skin just soaked up. It easily absorbed into my skin and blended like a dream. The lightweight formula can absolutely stand to be built up with more than one layer without getting heavy or cakey. In fact, even with two layers, I hardly felt like I was wearing makeup. Now, like I said in the first paragraph of this post, people are having wildly different experiences with this foundation. I’ve heard everything from the foundation leaves a dewy finish that is too shiny for oily skin, to the foundation leaves a matte finish. I’ve heard that It has no coverage to it has full coverage. I don’t know why there is such a big disparity, but I can tell you how The Lifter worked for me, and you can do with it what you will.
My experience was the Maybelline Instant Age Rewind The Lifter Foundation gave me buildable light to medium coverage, with a semi-matte, almost powder finish. I haven’t heard anyone else say that they experienced a powder finish when using The Lifter, but I swear that’s what it looked like to me, but better. What I mean is, despite a somewhat powder finish, my skin still had a natural glow and didn’t leave me looking too matte or fake in any way. I chose not to top it with powder because I simply didn’t feel like I needed to. Perhaps the finish varies based on how oily or dry your skin is. Coverage seems to be the biggest bone of contention and area of complaint. I don’t often wear tinted moisturizers or light coverage foundations because I have skin problems. I have mild rosacea that makes me red and blotchy, large pores (thanks dad), freckles, and general unevenness. That’s why I wear makeup in the first place. I was really pleased with the coverage that Maybelline Instant Age Rewind The Lifter Foundation gave me. A lot of people are complaining that it has no coverage and some of that is probably based on skin type, but I really think it has more to do with application method. I’m telling you, use your fingers.
To show you how Maybelline Instant Age Rewind The Lifter Foundation worked for me, I’m doing the unthinkable. I’m showing you my naked face with no makeup on at all. I still can’t believe that I am doing this. Here I am with all of the skin issues that I talked about above, not to mention my complete lack of eyebrows (thanks mom). This is the before and after.
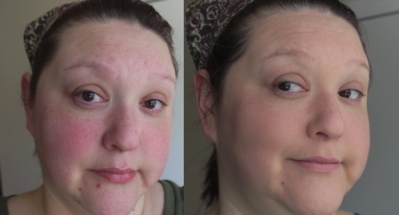
Before and after Maybelline Instant Age Rewind The Lifter Foundation
You can see by this picture why I say that I need foundation with good coverage because my skin needs help. I used one layer over my whole face, and then built up with a second layer over my real problem areas (nose, apples of my cheeks, and break out area on my chin). As you can see, Maybelline Instant Age Rewind The Lifter Foundation did a great job covering my rosacea redness, and even that angry red zit on my chin (with an extra spot of foundation). My freckles still show through, but not as dark, and you can still see a flush of pink on my nose and cheeks, but it’s way more even. I think it looks very natural. I say this is medium coverage. My Revlon Whipped Creme Foundation covers more, but that is a full coverage foundation in my mind, and much heavier on the skin than The Lifter.
When applying the rest of my makeup that day, I still needed to use concealer to make sure that zit stayed covered all day. I did not top the foundation with a powder, and just added a little Maybelline Instant Age Rewind Dark Circle Eraser Concealer under my eyes. Here are some photos of how it wore throughout the day:

The Lifter foundation after one hour, three hours and six hours.
The first picture was about an hour or so after application. I ate lunch and then applied the rest of my makeup before snapping the pic. The middle picture was about three hours into wear. The Lifter is holding up and not oxidizing. I think it still looks freshly applied. The third picture is after six hours or so of wear. Sorry the lighting is so yellow. The sun had set, so I snapped a pic with indoor lighting. I think that The Lifter wore really well. The only place that I saw an issue was my nose. The Lifter still covered my redness and freckles (with very little fading) but I felt my pores were more noticeable than I would have liked. Though the built-in primer worked well for the rest of my face, my gigantic pores need a little extra help. I may end up only applying primer to my nose when I wear this foundation in the future.
So that’s it. I actually really love the way Maybelline Instant Age Rewind The Lifter Foundation looks on me. I think it’s probably best for normal to dry skin, but frankly, it’s hard to tell. After wearing it a few times, I found that the coverage starts to fade after hour six, specifically on my nose. By hour eight, I can definitely see some redness breaking through, but again, that is without a setting powder. I’m sure that if I put a different primer on my nose and then finished with a setting powder I could get a few more hours out of The Lifter. That sort of defeats the purpose, though. The whole point is that this one product does the job of two (or in my case three) other products. Maybelline Instant Age Rewind The Lifter Foundation can be found priced anywhere from $11.99 to $14.99, depending where you shop. Personally, I love it. I will definitely be using Maybelline Instant Age Rewind The Lifter Foundation when I want a lighter foundation than my Revlon Whipped Creme.
Let me know if you have used Maybelline Instant Age Rewind The Lifter Foundation and how it worked for you. I am really curious about the wide mix of reviews it has gotten. What do you think?